
Introduction
When using Prendio you are working with two companies. You are working with Prendio, the Software manufacturer, and BioProcure, your Service Provider. BioProcure also uses Prendio.
Help Requests
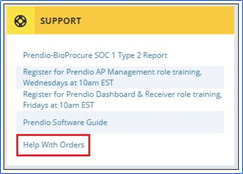
On the Prendio Dashboard below the Support Heading is a Link to Help with Orders. This will create an Email Message to help@bioprocure.com. Be as descriptive as possible with your question or request so our Customer Service Team can quickly route it to the appropriate team.
About This Document
Prerequisites
The Prendio Accounts Payable role
is required. User roles are assigned by a Company Admin.
Accounts Payable > Scan:

This is where Scanned Invoices are
Uploaded then Matched to the appropriate Purchase Order.
Accounts Payable > Scan >
Scan Upload:
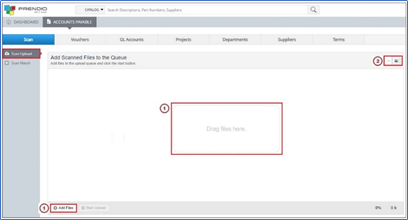
1. Either drag PDF file(s) here or press Add Files to maneuver to and select
PDF file(s).
2. Click on these icons to display the PDF files in a thumbnail or list view.
3. Click on the minus (-) icon
in the upper right-hand corner of
a thumbnail to delete it if needed.
4. The name and size of
the document display here.
5. The combined size of the documents in this window display here.
6. Press Start Upload to upload the PDF file(s).
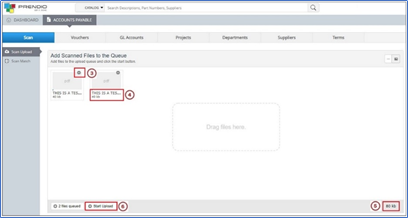
Note: In
this example Start Upload was pressed.

7. During the upload,
a progress bar will appear at the bottom of each
thumbnail. When the upload is complete for that thumbnail, a checkmark will appear
in the upper right-hand corner.
8. The progress of all the documents being uploaded appears here.
Accounts Payable > Scan > Scan Match:
The Scan Match window is used to match the appropriate Invoice with a PO
Number.
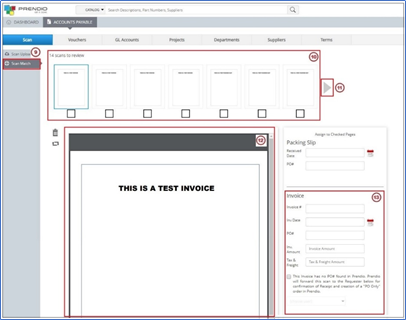
9. Scan Match is selected.
10. The number of scans to review appears here.
11. If there are many
scans to review, arrows will display to advance forward and back.
12. When a thumbnail
is selected, it will display in a larger view
here.
13. These are the fields used when processing an
Invoice.
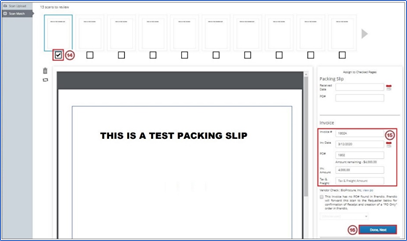
14. Check the box below the invoice to be matched to the PO.
Note: Some of the information entered below
is obtained from the actual invoice selected. In these examples test invoices were
used so fictional information was used.
15. The Invoice #, Inv Date, PO #, Inv Amount, and Tax & Freight are
entered.
16. Press Done, Next.
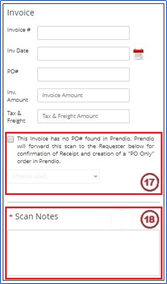
Additional Fields
17. This field is used when an
Invoice was received but there is no Packing Slip or PO Number available. When this occurs, the PO # field is left blank, and
this box is checked. Checking this box activates the pulldown menu displaying
the names of other Prendio Users. The user believed to be the Requester of this
order can then be selected from the pulldown menu and can be sent a Proxy
Request to confirm this is his or her order.
18. The Scan Notes field can be used to add a note to the Packing Slip.
Accounts Payable > Vouchers
This window is used to process Scanned Invoices into Vouchers.
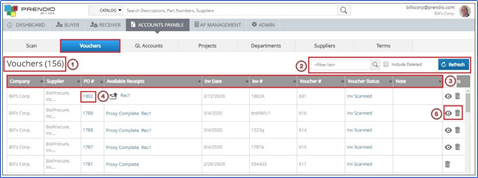
1. The Number of Vouchers is
displayed here.
2. The Filter field can be
used to search for data in
this window and the Refresh button is used to clear the filter and display all
receipts.
Note: Checking Include Deleted will display
orders that were deleted.
3. The Company, Supplier, PO #, Available
Receipts, Inv Date, Inv # Voucher #, Voucher
Status, and Notes columns can be sorted using the Arrowhead icons.
4. Clicking on the link in the PO # column will
display the PO in another browser tab.
5. The View (eyeball) icon is used to view a Scanned Invoice and create the voucher.
The Trash Can icon
can be used to delete a Scanned Invoice.
The links in the Available Receipts column can be used to view the Receipt or Proxy Packing Slip details.
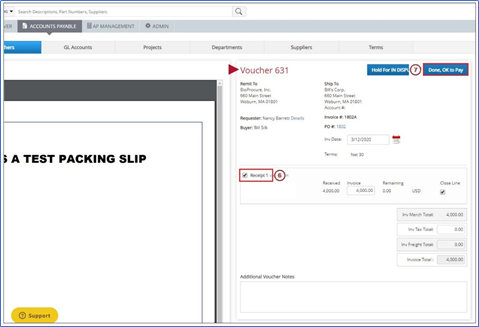
6. The Receipt checkbox
is checked.
7. Done, OK to Pay is
pressed.
Note: When a voucher is created, it is moved from the Vouchers window to the AP
Management > AP Push window.
Prendio Flexible Segments:
Prendio uses Flexible Segments which allows your
Company to Rename, Increase, or Decrease the number of Segments (aka Coding) to Integrate with your ERP System.

In this example, the Billscorp Company is using three
segments, Department, GL Account, and Project. The number
and naming of the segments that display in Accounts Payable are configured in
AP Management > General > Accounting by the AP Manager role and Prendio
Technical Support. The defaults are selected here, but you may see fewer or
more segments and perhaps the names Class and Location.
Accounts
Payable > Departments
This window is used to manage the Prendio Departments and the ERP
Departments.
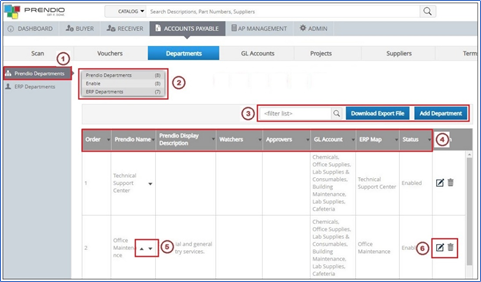
1. Here Prendio Departments is
selected, this is where the Prendio
Departments are created and saved.
2. The
number of Prendio Departments, ERP Departments, and how
many are enabled are displayed here.
3. The Filter field can be
used to search for data in this window. Download
Export File exports the contents of this window to a .CSV file, and the Add Departments button
is used to create new Departments.
4. The Order, Prendio Name, Prendio Display Description, Watchers, Approvers, GL Account, ERP
Map, and Status columns can be sorted using the Arrowhead icons.
5. The arrowheads next to
the Prendio Names can be used to move the Departments up and down in this window. This affects
the order in which they appear in the Department pulldown menu in a cart.
6. The Edit (pencil) icon can be used to edit a Departments and the Trash Can icon can be used to delete
a Department. In this example a Department was edited, and the General tab is displayed.
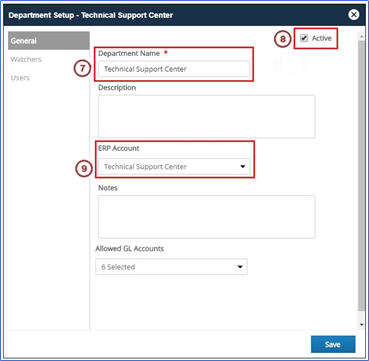
7. The Department Name field is where
the name is entered.
8. Active must be
selected for the Department to be available for use in an order.
9. The ERP Map pulldown
menu is used to select the ERP Department that will be used for this Prendio Department.
The Description and Notes fields are optional.
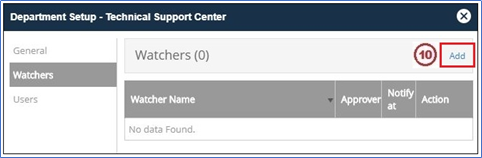
10. Press Add to open a
window to add Watchers.
The Users tab is then selected. For a Department to be available in a cart the user must
be a member of the Department selected in that cart.
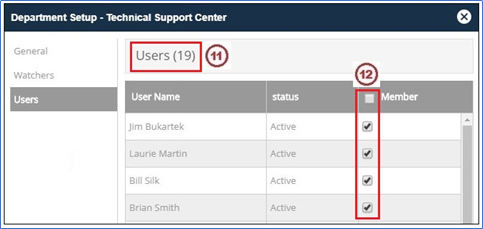
11. The number of available Users displays
here.
12. Check this box for all users to be a member of this Department or check individual Users.
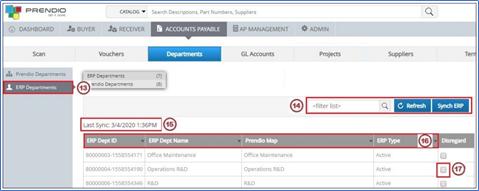
13. ERP Departments is
selected, this is where the ERP Departments are imported and stored.
15. When the last Sync was completed displays here.
16. The ERP Project ID, ERP
Dept Name, Prendio Map, and ERP Type columns
can be sorted using the Arrowhead icons.
17. Check the box in
the Disregard column for that ERP
Department not to display when mapping Prendio Projects.
Accounts Payable
> GL Accounts:
This window is used to manage the Prendio GL Accounts and the ERP Accounts.
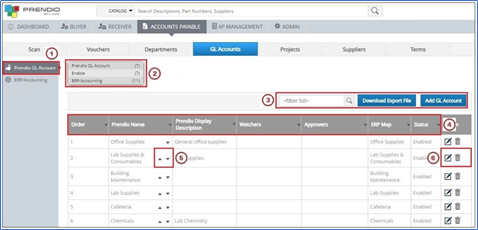
1. Here Prendio GL Account is
selected, this is where the Prendio GL Accounts are created and saved.
2. The number of Prendio GL Accounts, ERP/Accounting,
and how many are enabled are displayed here.
3. The Filter field can be
used to search for data in this window. Download
Export File exports the contents of this window to a .CSV file, and the Add GL Account button
is used to create new GL Accounts.
4. The Order, Prendio Name, Prendio
Display Description, Watchers, Approvers, ERP
Map, and Status columns can be sorted using the Arrowhead icons.
5. The arrowheads next to the Prendio Names can be used to move the GL Accounts up and down in this window.
This affects the order in which they appear in the GL Account pulldown menu in
a cart.
6. The Edit (pencil) icon can be used to edit a GL Account and
the Trash Can icon
can be used to delete a GL Account.
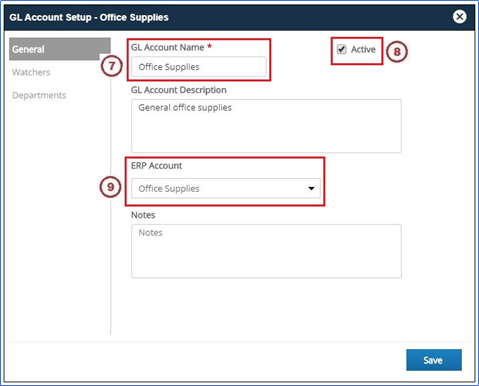
7. The GL Account
Name field is where the name is entered.
8. Active must be selected for the GL
Account to be available for use in an order.
9. The ERP Account pulldown menu is used to select the ERP Account
that will be used for this Prendio GL
Account.
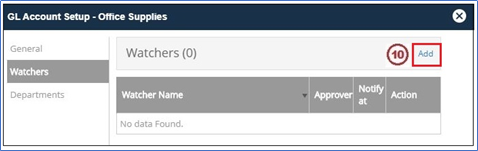
10. Press Add to open a
window to add Watchers.
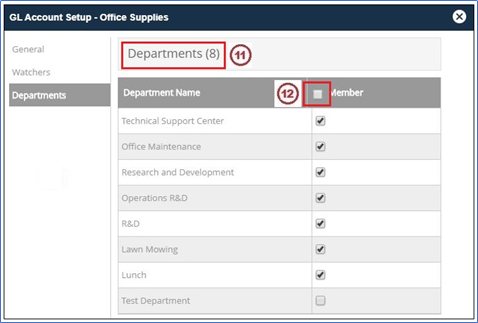
11. The number of available Departments displays here.
12. Check this box for this GL Account to be a Member of all departments or check individual Departments.
Tax and
Freight Assignment:
How the Tax and Freight expenses are to be paid can be selected here.
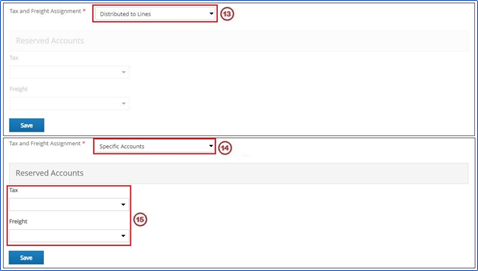
13. Distributed to
Lines is the most frequently used
selection. This will divide the expenses evenly
among the line items in an order.
14. Specific Accounts is another option.
15. This
option allows these expenses to be distributed to
specific GL Accounts.
Note: Tax and Freight can also be configured in AP Management > General.

16. Here ERP/Accounting is selected, this is where the ERP
Accounts are imported and stored.
19. The ERP Account ID, ERP
Account Name, Prendio Map, and Account Type columns
can be sorted using the Arrowhead icons.
20. Check the box in
the Disregard column for that ERP
Account not to display when mapping Prendio GL
Accounts.
Accounts Payable
> Projects
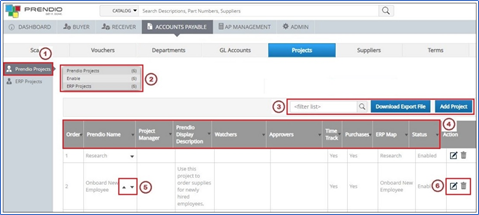
1. Here Prendio Projects is selected this is where the Prendio Projects are
created and saved.
2. The number of Prendio
Projects, ERP Projects, and how many are enabled are
displayed here.
3. The Filter field can be used to search for data in this window. Download Export File exports
the contents of this window to a .CSV file,
and the Add Project button is used to create
new Projects.
4. The Order, Prendio Name, Project
Manager, Prendio Display Description, Watchers, Approvers, Time Track, Purchases, ERP Map, and Status columns can be sorted using the Arrowhead icons.
5. The arrowheads next to the Prendio Names can be used to move the Projects up and down in this window. This
affects the order in which they appear in the Project pulldown menu in a cart.
6. The Edit (pencil) icon can be used to edit a Project and
the Trash Can icon
can be used to delete a Project.
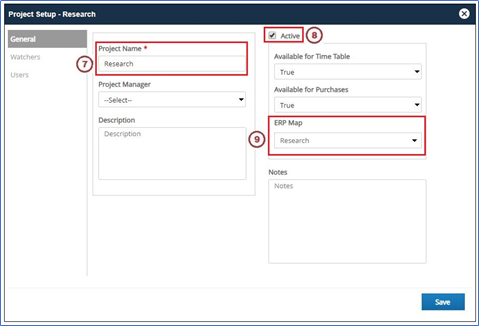
7. The Project Name field is where the name is entered.
8. Active must be
selected for the Project to be available for use in an order.
9. The ERP Map pulldown
menu is used to select the ERP Project that will be
used for this Prendio Project.
Note: The
Project Manager and Available for Time Table pulldown menus are optional, and
the Available for Purchases pulldown menu should be set to True. The Project
Description and Notes fields are also optional.
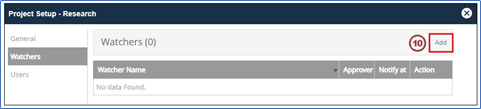
10. Press Add to open a
window to add Watchers.
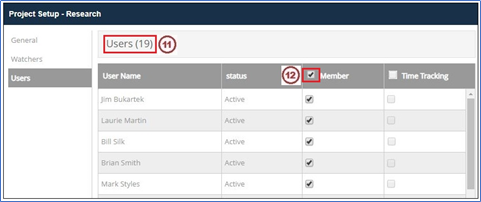
11. The number of available Users displays
here.
12. Check this box for all users to be a member of this Project or check individual Users.
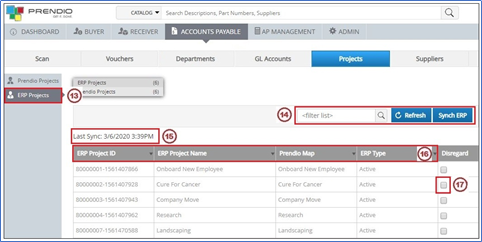
13. ERP Projects is
selected, this is where the ERP Projects are imported and stored.
15. When the last Sync was completed displays here.
16. The ERP Project ID, ERP Project
Name, Prendio Map, and ERP Type columns
can be sorted using the Arrowhead icons.
17. Check the box in
the Disregard column for that ERP
Project not to display when mapping Prendio Projects.
Accounts
Payable > Suppliers

1. Here Prendio Connected
Suppliers is selected, this is where
the Prendio connected Suppliers are created and saved.
2. The number of Prendio
Connected Suppliers, and ERP Total
Suppliers are displayed here.
3. The Refresh button is used to clear the filter. The Filter field can be
used to search for data in this window. Download
Export File exports the selected suppliers to a .CSV file (see step 5).
4. The Supplier, Enabled, and ERP
Link, and ERP Suppliers columns
can be sorted using the Arrowhead icons.
5. The All checkbox can be selected to
include all suppliers or Individual Supplier checkbox(es) can be checked to include certain suppliers in the Supplier Export
File.
6. Click on the link to
the Supplier Name to edit a supplier.
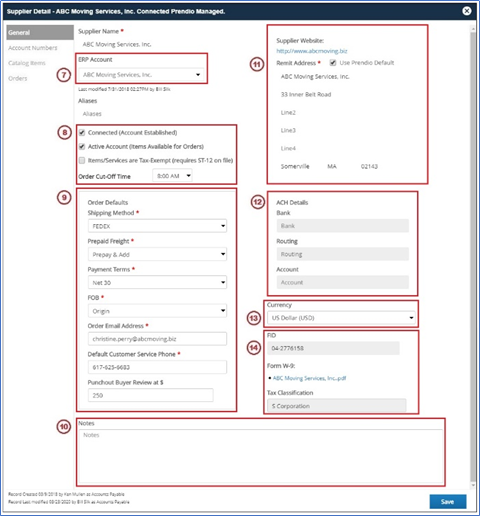
7. The ERP Account field is where the ERP
Supplier is selected.
Note: Bills
for this supplier will be pushed to this supplier in the ERP System.
8. These fields and boxes are completed by the Prendio Catalog Manager and
the Buyer when
the supplier was added to Prendio
and an Account was established.
9. These fields are also completed by the Prendio Catalog Manager and
the Buyer when
the supplier was added to Prendio and an Account was established.
Note: These
fields can be changed at the customer level.
10. Use this field
to add Notes.
11. This is the Email and Remit to Address information for the supplier that will be sent to the ERP System
during a Push.
Note: Deselect
Use Prendio Default to modify the address to push different address information
for the supplier.
12. Banking Information is setup by the Prendio
Catalog Manager.
13. The Currency is setup
by the Prendio Catalog Manager. Note: This field can be changed at the customer level.
14. These
fields and the attached tax document are completed by the Prendio Catalog Manager.
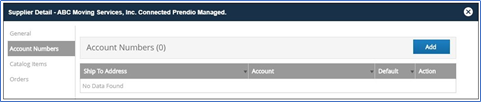
Account Numbers can
be added to this tab when needed.
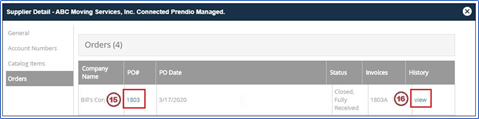
15. Click on
the PO# link
in the PO column to open the PO in a new browser tab.
16. Click on
the view link
in the History column to open the Order History for this PO.
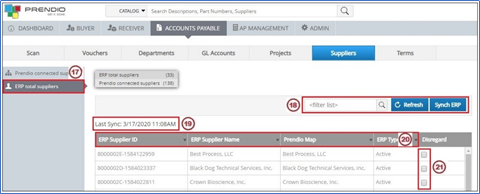
19. When the last Sync was completed displays here.
20. The ERP Supplier ID, ERP
Supplier Name, Prendio Map,
and ERP Type columns
can be sorted using the Arrowhead icons.
21. Check the box in
the Disregard column for that ERP
Supplier not to display when mapping Prendio Suppliers.
Accounts
Payable > Terms
This window is used
to manage the Prendio Terms and the ERP Terms.
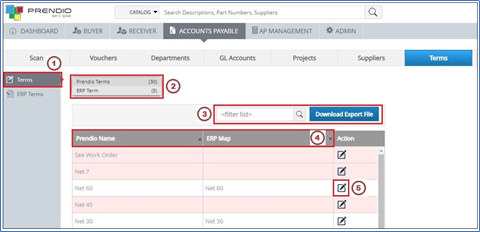
1. Terms is
selected, this is where the Terms are saved.
2. The number of Prendio
Terms, and ERP Terms are displayed here.
3. The Filter field can be used to search for data in this window. Download Export File exports
the contents of this window to a .CSV file.
4. The Prendio Name,
and ERP Map columns can be sorted using
the Arrowhead icons.
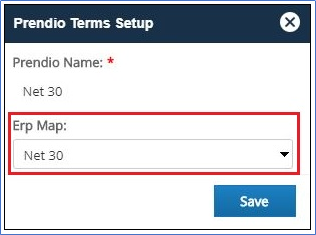
5. Click on the edit (pencil) icon to edit a Term.
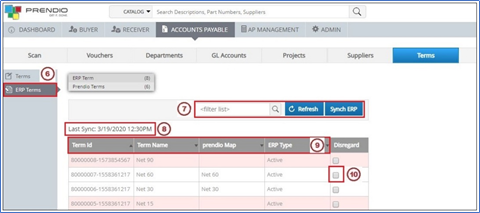
6. Here ERP Terms is
selected, this is where the ERP Terms are imported and stored.
7. The Filter field can be used to search for data in this window and
the Refresh button
is used to clear
the filter. Synch ERP is used to connect to the ERP System and
Synchronize these resources with Prendio. ERP Termsnot in this window prior to the sync will be imported
during this process.
8. When the last Sync
was completed displays here.
9. The Term ID, Term Name, Prendio
Map, and ERP Type columns can be sorted using the Arrowhead icons.
10. Check the box in the Disregard column for that ERP Term not to
display when mapping Prendio Suppliers.