About This Document:
This document details the steps to follow when setting up the initial ERP Integration between Prendio and Quickbooks Desktop.
Prerequisites:
Quickbooks Desktop must be installed and running on the same computer used to connect to Prendio.
Prior Setup:
The Prendio GL Accounts, Projects, and Departments were created prior to following this procedure. During this procedure, these will be mapped to the same resources in Quickbooks Desktop. The Prendio Suppliers used in this document were connected to this company by the Buyer, and the Prendio Terms were created by Prendio.
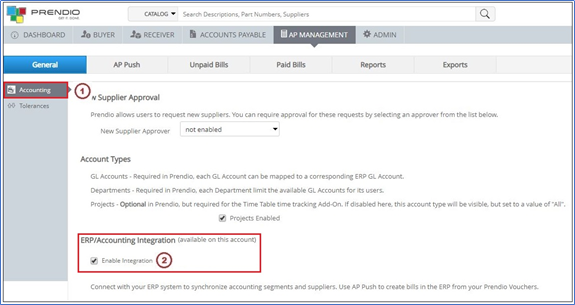
AP Management > General:
1. Select Accounting;
2. Check the Enable Integration checkbox;
Note: In this example, the optional Projects Enabled checkbox is also checked.
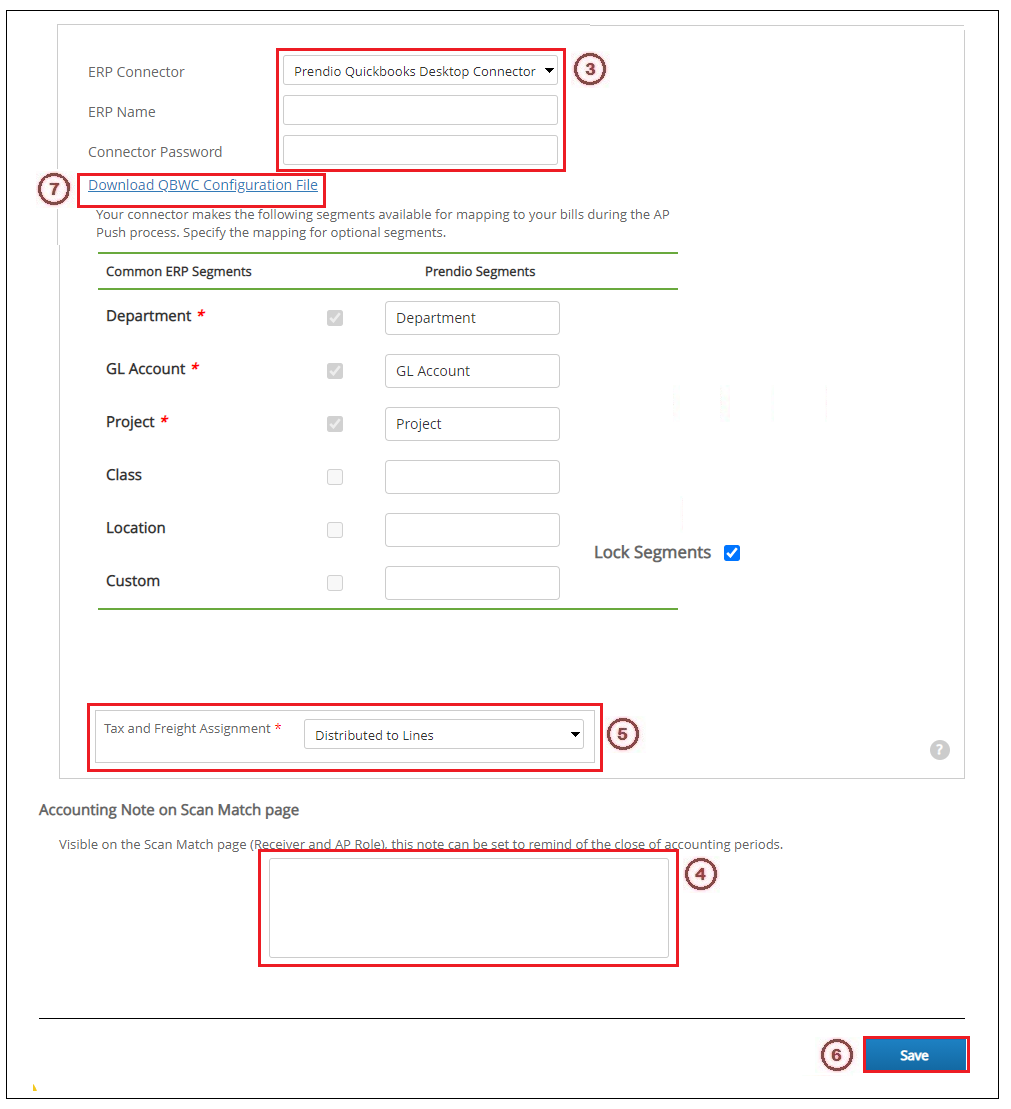
3. From the ERP Connector pulldown menu select Prendio QuickBooks Desktop Connector, In the ERP Name field enter the name of the QuickBooks Desktop company you are connecting to, and in the Connector Password field enter the password for the QuickBooks company;
4. Enter an Optional Note Accounting Period Close in this field;
5. In the Tax and Freight Assignment field choose Distributed to Lines to have these expenses divided among the Line Items in order. Select Specific Accounts to add these expenses to a GL Account.
6. Press Save when complete.
7. Click on the Download QBWC Configuration File link to download the web connector application to your computer.
Note: This will download the application to the default download location for the logged-on user. This is usually the Downloads folder for that user.
Installing The Web Connector Application:
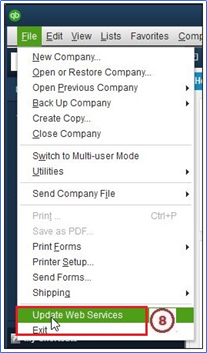
8. Launch QuickBooks Desktop and from the File pulldown menu select Update Web Services.
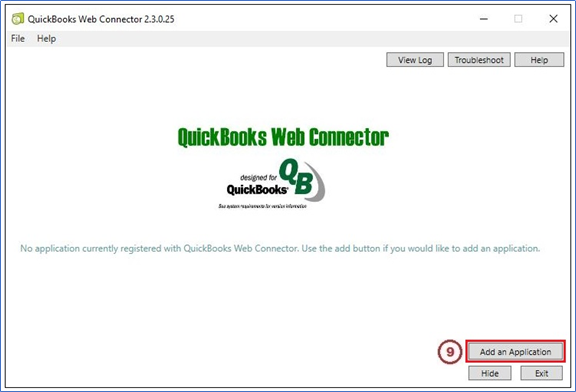
9. When the QuickBooks Web Connector opens, press the Add an Application button.
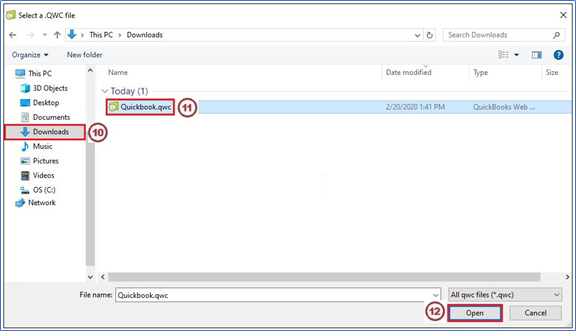
10. Maneuver to the location of the application downloaded in Step 7, in this example the Downloads folder is used.
11. Select the Quickbook.qwc file.
12. Press Open.
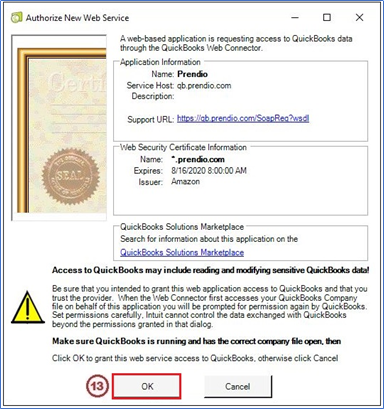
13. At the Authorize New Web Service window, press OK.
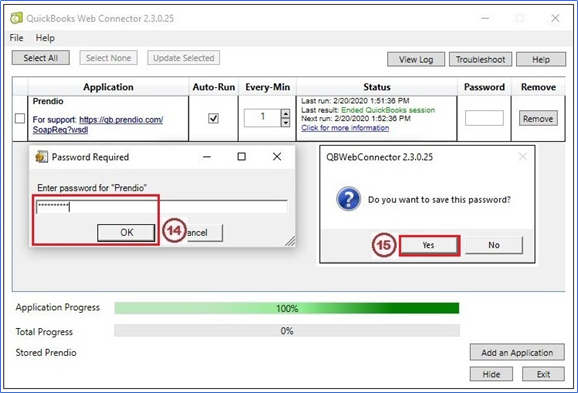
14. In the Password Required prompt, enter the password, then press OK.
15. Press Yes at the Do you want to save this password? prompt.
Installation and configuration of the Web Connector is now complete, leave this a window open, it is needed to complete each of the steps detailed next.
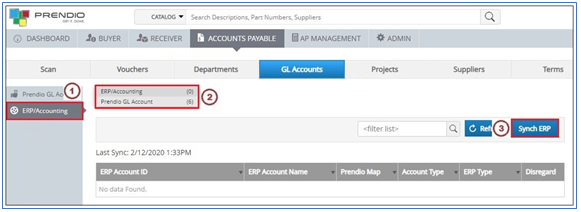
Accounts Payable > GL Accounts:
As detailed earlier, the Prendio GL Accounts were created prior to the connector configuration. The connector will now be used to Synchronize the GL Accounts with QuickBooks Desktop. The Sync will import these resources (Accounts/Expense) into Prendio.
1. Select ERP Accounting;
2. Note that ERP/Accounting displays 0 ERP/Accounting;
3. Press the Synch ERP button;
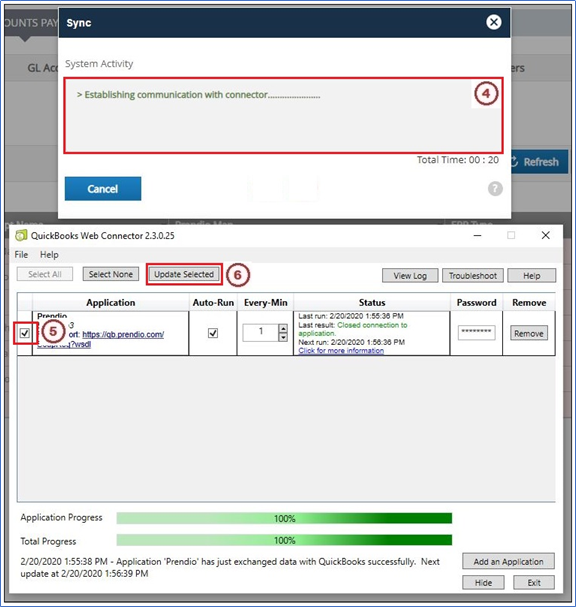
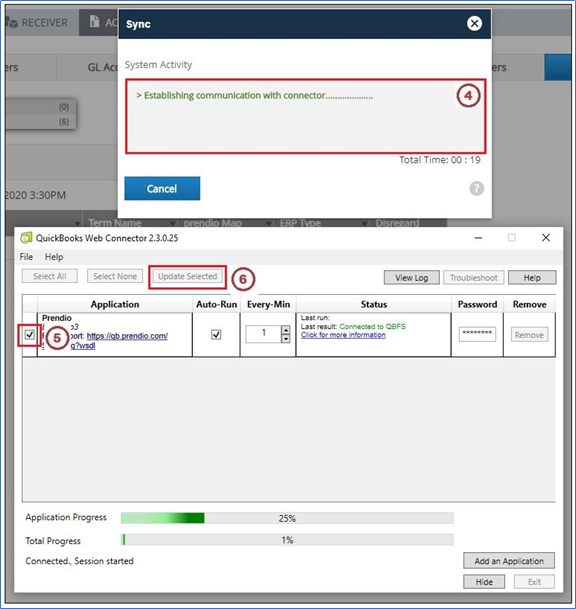
4. The Sync window will open, and feedback is captured in the System Activity field of this window;
5. Check the box to the left of the application that was added earlier;
6. Periodically the Update Selected will become available when the connector is waiting for more information. Press this button when it becomes available to help expedite this process;
Note: The Sync window will close automatically when this process is complete.
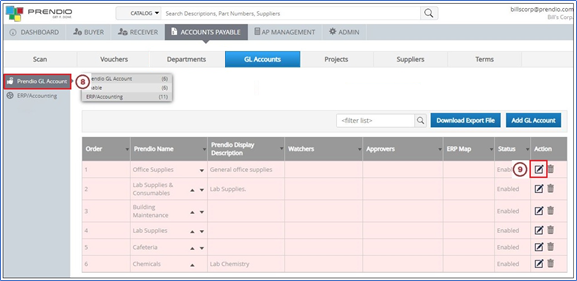
7. The Sync is now complete, and ERP/Accounting now displays 11 ERP Accounts;
These ERP Accounts can now be mapped to the Prendio GL Accounts.
8. Select Prendio GL Account;
9. Click on the Edit (pencil) icon to edit a GL Account and map it to the appropriate ERP Account;
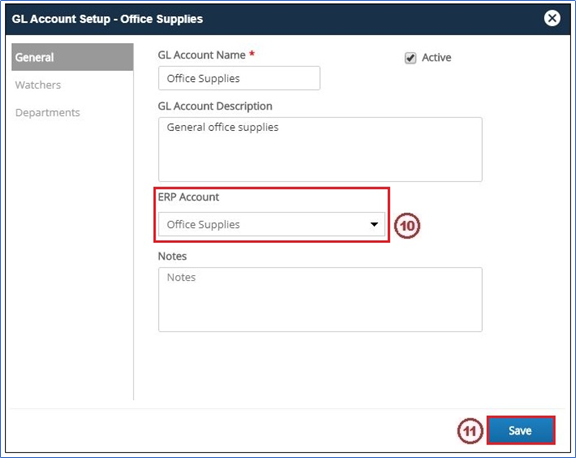
10. When the Prendio GL Account window opens, select the appropriate ERP Account from the ERP Account pulldown menu;
11. Press Save when complete.
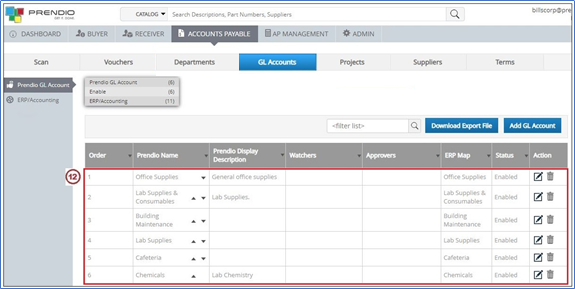
Note: Follow Steps 1 – 11 to map the remaining GL Accounts.
12. Mapping of the GL Accounts is now complete.
Accounts Payable > Projects:
As detailed earlier, the Prendio Projects were created prior to the connector configuration. The connector will now be used to Synchronize the Projects with QuickBooks Desktop. The Sync will import these resources (Customers) into Prendio.
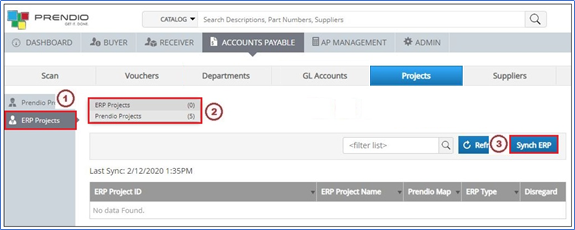
1. Select ERP Projects;
2. Note that ERP/Accounting displays 0 ERP/Projects;
3. Press the Synch ERP button.
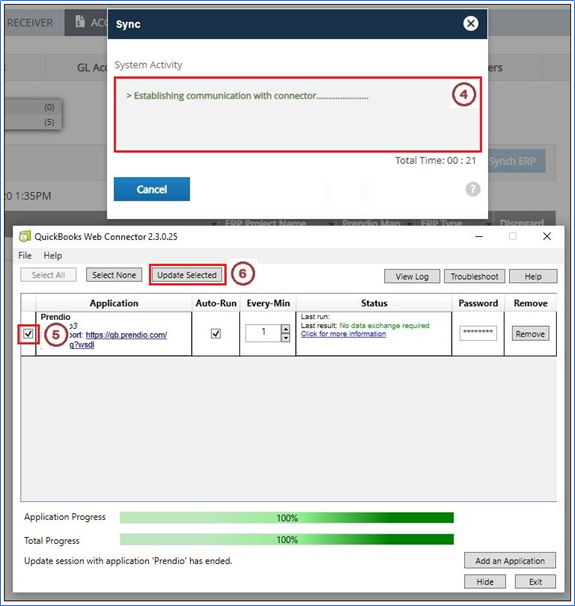
4. The Sync window will open, and feedback is captured in the System Activity field of this window;
5. Verify that the box to the left of the application that was added earlier is still selected;
6. Periodically the Update Selected will become available when the connector is waiting for more information. Press this button when it becomes available to help expedite this process;
Note: The Sync window will close automatically when this process is complete.
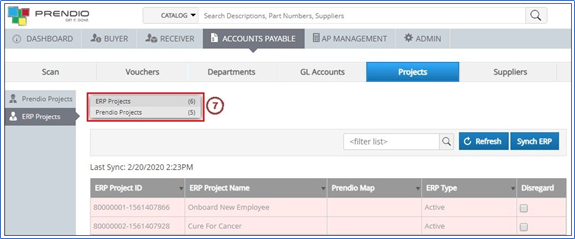
7. The Sync is now complete, and ERP Projects now displays 6 ERP Accounts;
These ERP Projects can now be mapped to the Prendio Projects.
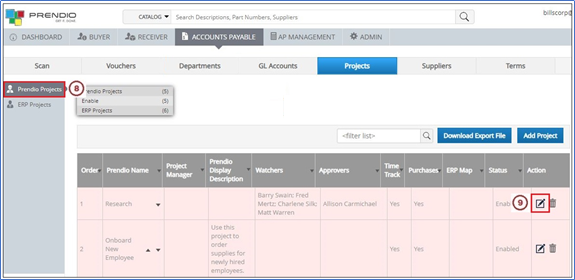
8. Select Prendio Projects;
9. Click on the Edit (pencil) icon to edit a GL Account and map it to the appropriate ERP Project;
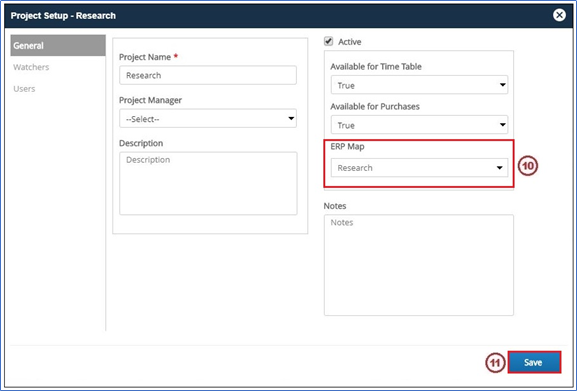
10. When the Prendio Project window opens, select the appropriate ERP Project from the ERP Account pulldown menu;
11. Press Save when complete.
Note: Follow Steps 1 – 11 to map the remaining Projects.
12. Mapping of the Projects is now complete.
Accounts Payable > Departments:
As detailed earlier, the Prendio Departments were created prior to the connector configuration. The connector will now be used to Synchronize the Departments with QuickBooks Desktop. The Sync will import these resources (Accounts/Expense) into Prendio.
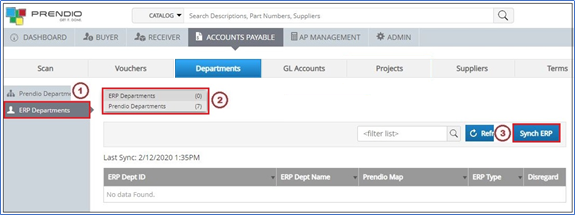
1. Select ERP Departments;
2. Note that ERP Departments displays 0 ERP Departments;
3. Press the Synch ERP button;
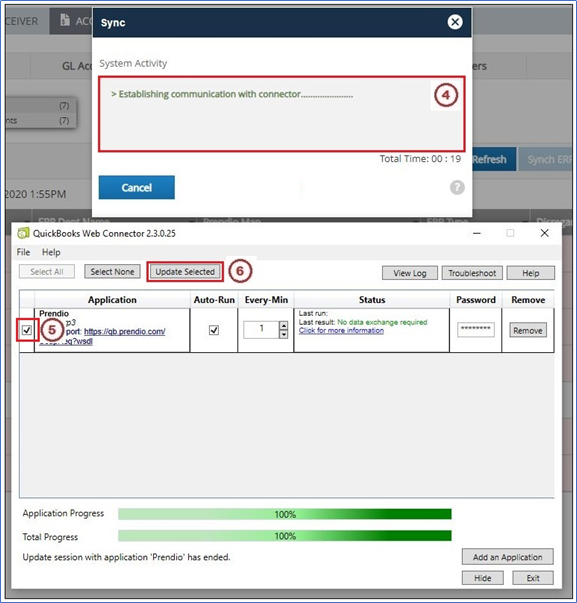
4. The Sync window will open, and feedback is captured in the System Activity field of this window;
5. Verify that the box to the left of the application that was added earlier is still selected;
6. Periodically the Update Selected will become available when the connector is waiting for more information. Press this button when it becomes available to help expedite this process;
Note: The Sync window will close automatically when this process is complete.
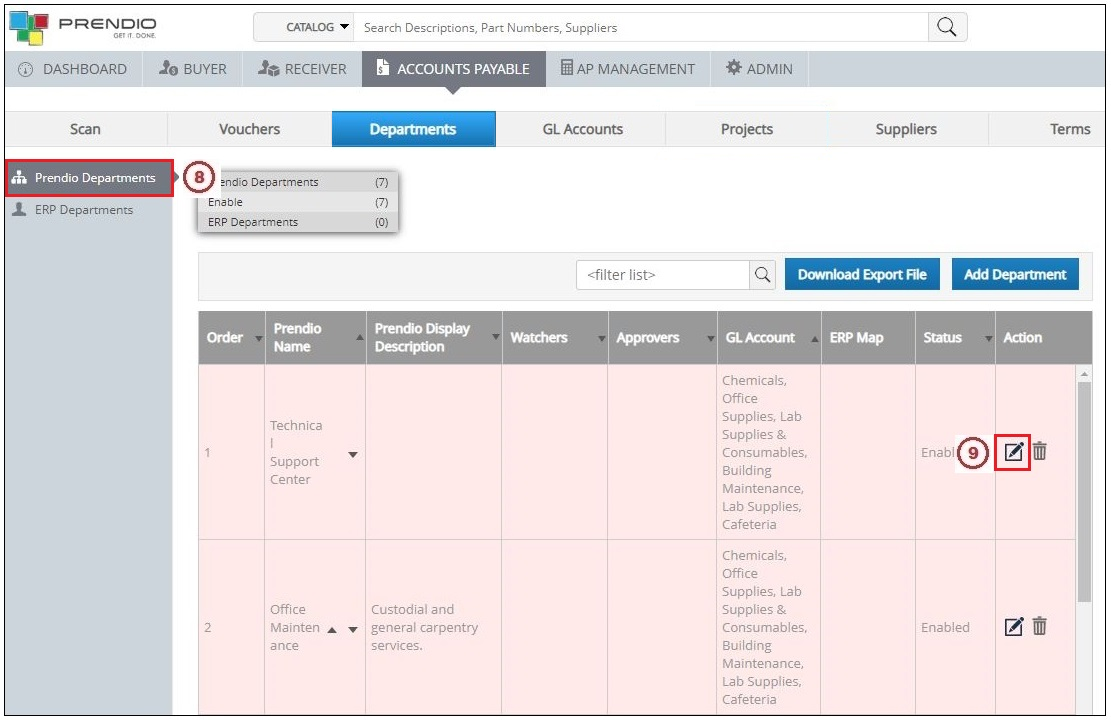
7. The Sync is now complete, and ERP Departments now displays 7 ERP Departments;
These ERP Departments can now be mapped to the Prendio Departments.
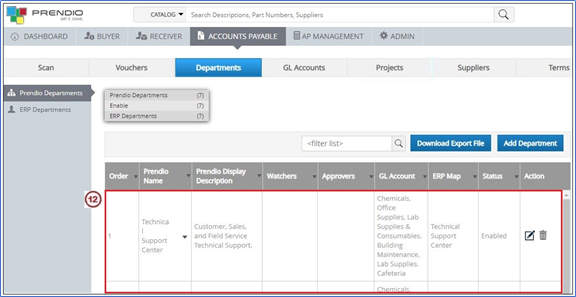
8. Select Prendio Departments;
9. Click on the Edit (pencil) icon to edit a Department and map it to the appropriate ERP Department;
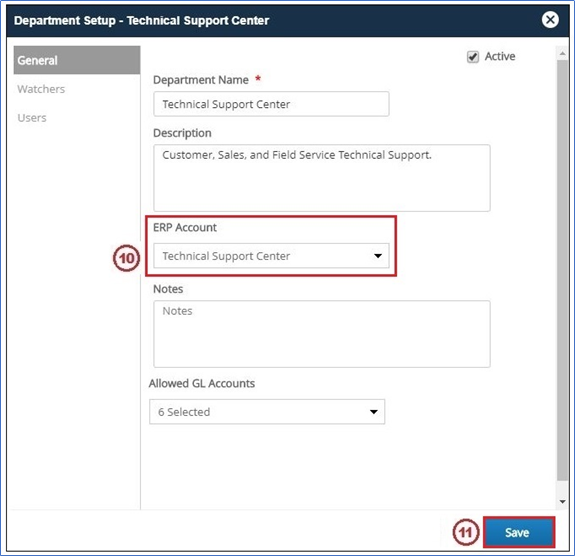
10. When the Prendio Department window opens, select the appropriate ERP Department from the ERP Account pulldown menu;
11. Press Save when complete.
Note: Follow Steps 1 – 11 to map the remaining Departments.
12. Mapping of the Departments is now complete.
Accounts Payable > Suppliers:
As detailed earlier, the Prendio Suppliers were connected prior to the connector configuration. The connector will now be used to Synchronize the Suppliers with QuickBooks Desktop. The Sync will import these resources (Vendors) into Prendio.
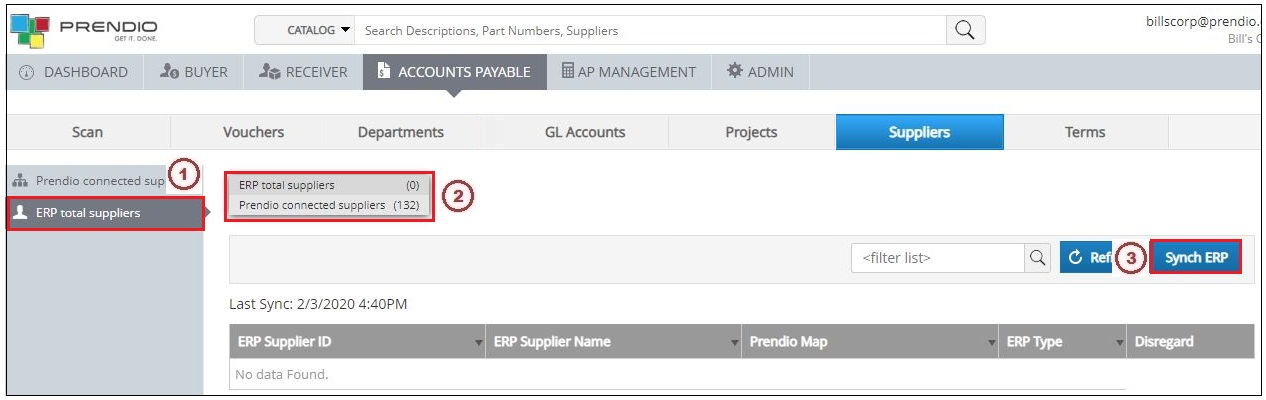
1. Select ERP Total Suppliers;
2. Note that ERP Total Suppliers displays 0 ERP Total Suppliers;
3. Press the Synch ERP button;
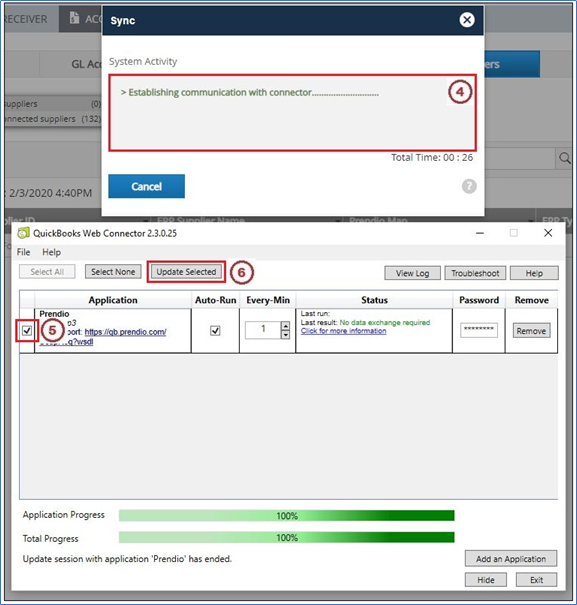
4. The Sync window will open, and feedback is captured in the System Activity field of this window;
5. Verify that the box to the left of the application that was added earlier is still selected;
6. Periodically the Update Selected will become available when the connector is waiting for more information. Press this button when it becomes available to help expedite this process;
Note: The Sync window will close automatically when this process is complete.
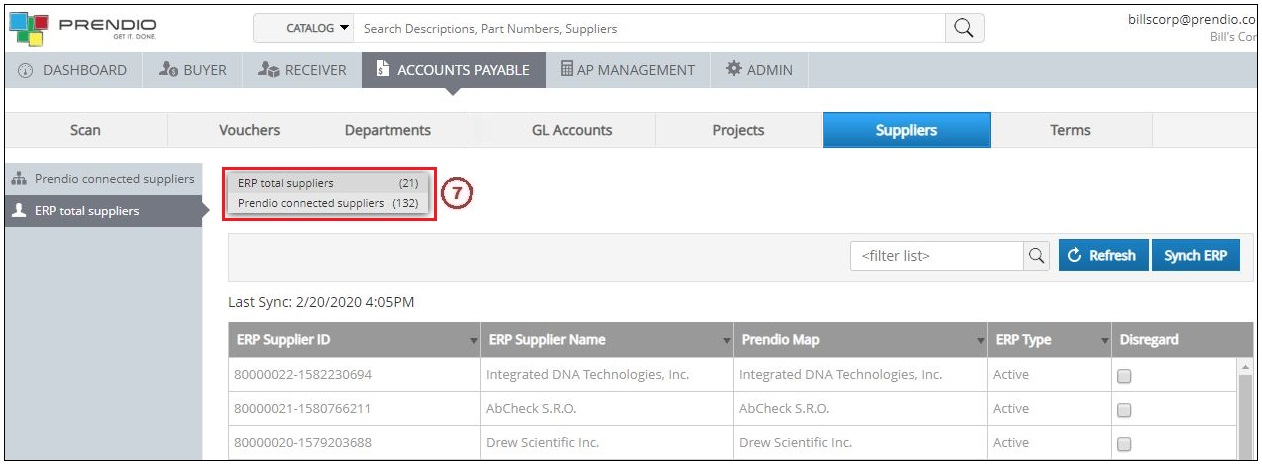
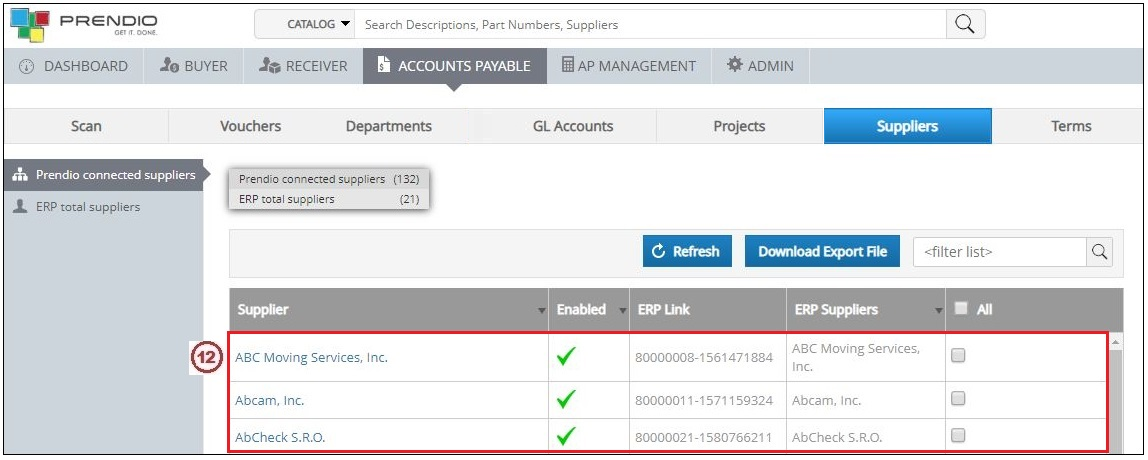
7. The Sync is now complete, and ERP Total Suppliers now displays 21 ERP Total Suppliers;
These ERP Suppliers can now be mapped to the Prendio Suppliers.
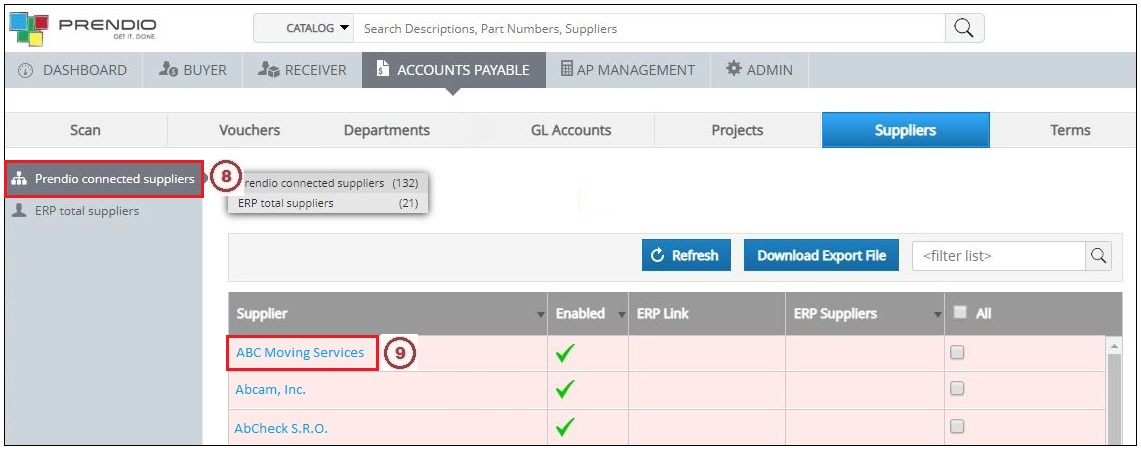
8. Select Prendio Connected Suppliers;
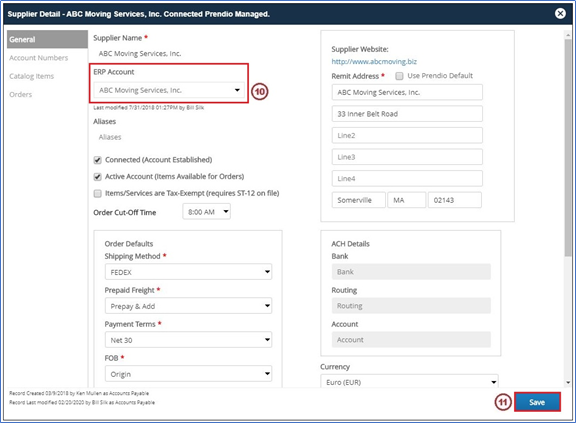
9. Click on the Edit (pencil) icon to edit a Supplier and map it to the appropriate ERP Account;
10. When the Prendio Supplier window opens, select the appropriate ERP Supplier from the ERP Account pulldown menu;
11. Press Save when complete.
Note: Follow Steps 1 – 11 to map the remaining Suppliers.
12. Mapping of the Suppliers is now complete.
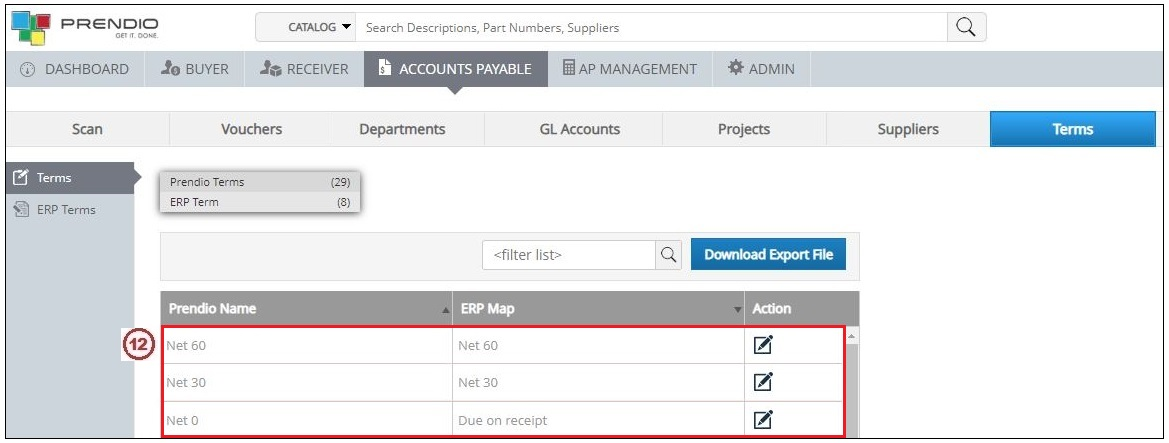
Accounts Payable > Terms:
As detailed earlier, the Prendio Terms were added by Prendio prior to the connector configuration. The connector will now be used to Synchronize the Terms with QuickBooks Desktop. The Sync will import these resources into Prendio.
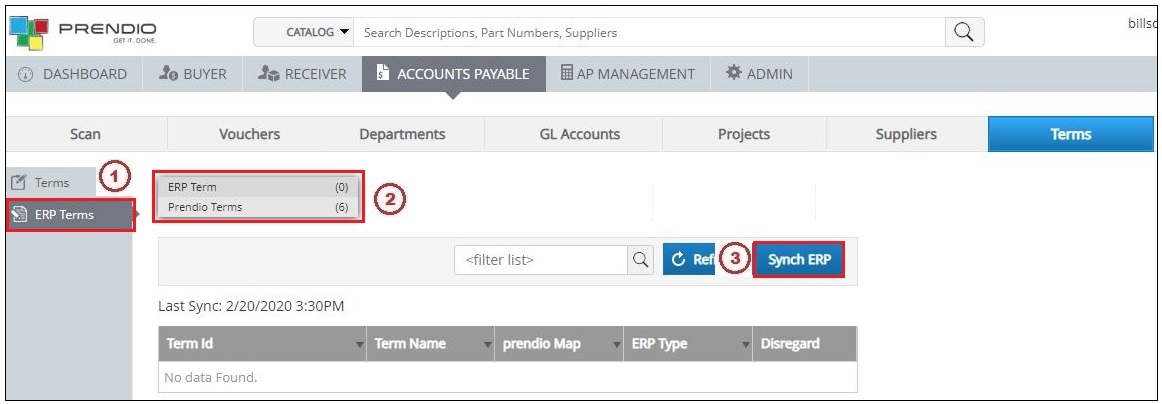
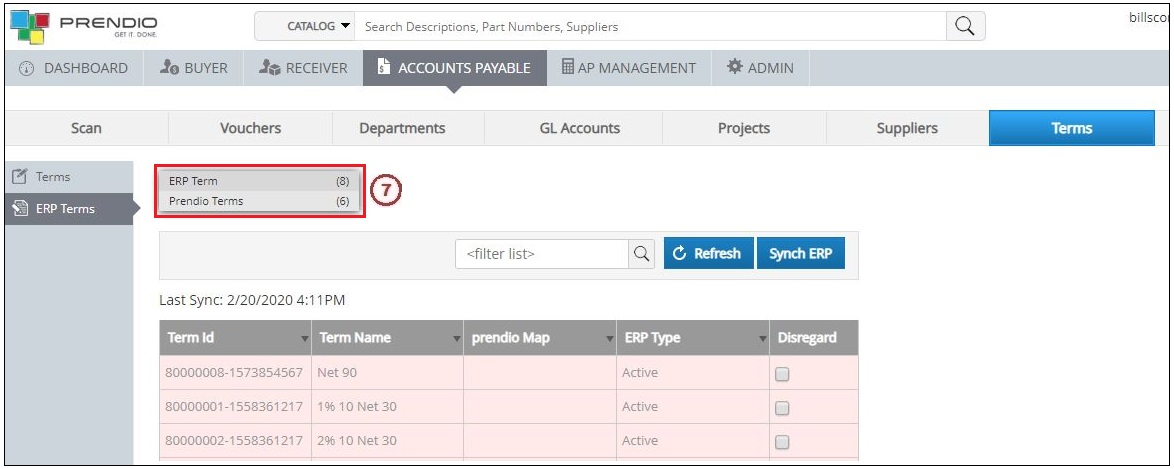
1. Select ERP Terms;
2. Note that ERP Terms displays 0 ERP Terms;
3. Press the Synch ERP button;
4. The Sync window will open, and feedback is captured in the System Activity field of this window;
5. Verify that the box to the left of the application that was added earlier is still selected;
6. Periodically the Update Selected will become available when the connector is waiting for more information. Press this button when it becomes available to help expedite this process;
Note: The Sync window will close automatically when this process is complete.
7. The Sync is now complete, and ERP Terms now displays 8 ERP Accounts;
These ERP Terms can now be mapped to the Prendio Terms.
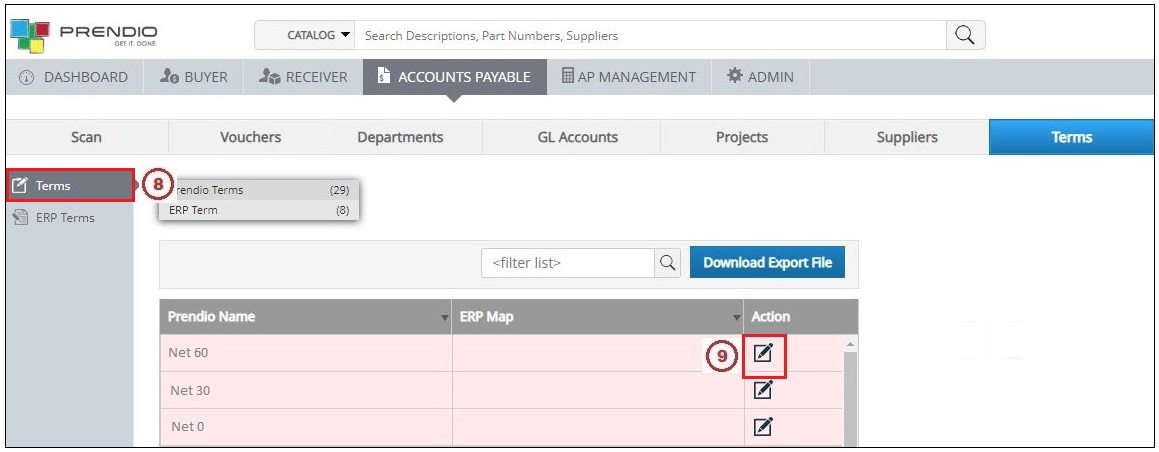
8. Select Terms;
9. Click on the Edit (pencil) icon to edit a Term and map it to the appropriate ERP Term;
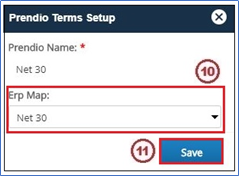
10. When the Prendio Terms window opens, select the appropriate ERP Term from the ERP Map pulldown menu;
11. Press Save when complete.
Note: Follow Steps 1 – 11 to map the remaining Terms.
12. Mapping of the Terms is now complete.
The QuickBooks Desktop Initial ERP Integration is now complete.