
Introduction
When using Prendio you are working with two companies. You are working with Prendio, the Software manufacturer, and BioProcure, your Service Provider. BioProcure also uses Prendio.
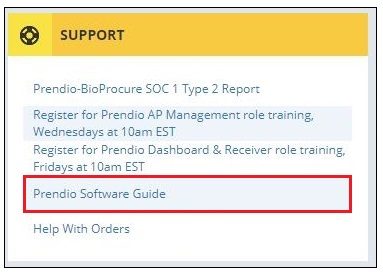
Help Requests
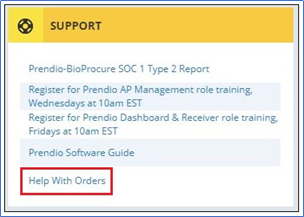
On the Prendio Dashboard below the
Support Heading is a Link to Help with Orders. This will create an Email
Message to help@bioprocure.com. Be as
descriptive as possible with your question or request so our Customer Service
Team can quickly route it to the appropriate team.
About This Document
This document details the features of
the Prendio AP Management role.
Prerequisites
The Prendio AP Management role
is required. User roles are assigned by a Company Admin.
AP Management > General > Accounting
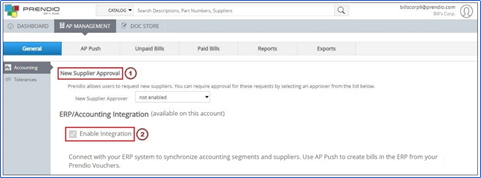
1. New
Supplier Approval can be enabled.
To enable this feature click
in the New Supplier Approver pulldown menu to select
a Prendio User from the list.
Once enabled, that user will need
to approve any new supplier requests
for your company.
2. Enable ERP
Integration This feature is not selected by default. When not
enabled Prendio orders are Exported as CSV (comma separated values) files for manual import into the ERP System. When enabled these orders can be
pushed to the configured ERP System.
Note: The
initial ERP Integration is completed with the assistance of the Prendio Technical
Support. Please contact help@bioprocure when any changes are necessary.
ERP
Connector Setup
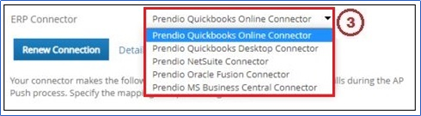
The
available selections are Prendio Quickbooks Online Connector, Prendio
Quickbooks Desktop Connector, Prendio NetSuite Connector, Prendio Oracle Fusion Connector and Prendio MS Business Central
Connector.
All
of these selections communicate website to website (online connector) with
the exception of Quickbooks Desktop.
Note: Quickbooks Online will be used in this example.
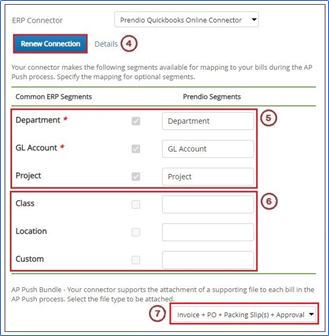
4. The Renew
Connection button is used to re-establish
communication between the Prendio and Quickbooks secure websites.
Prendio
Flexible Segments:
Common ERP
Segments are how the Segments are named internally in Prendio. These names
cannot be modified.
Prendio
Segments are how the Segments are named in the Prendio User Interface (examples:
Carts, Accounts Payable and AP Push).
5. The
default names are used here. These can be changed to
match the ERP Naming.
6. These are Optional
Segments and can only be enabled with
the assistance of Prendio Technical Support. Please contact help@bioprocure
when any changes are necessary.
7. With the Prendio online connectors an AP Push Bundle can be selected. This will attach
the document(s) in PDF format to the orders and these bundles will be pushed to
these ERP Systems.
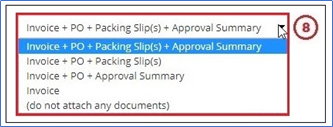
8. The documentation selections available display
in the AP Push Bundle pulldown menu. The selections are Invoice + PO +
Packing Slip(s) + Approval Summary, Invoice
+ PO + Packing Slip(s), Invoice + PO + Approval Summary, Invoice,
and (do not attach any documents).
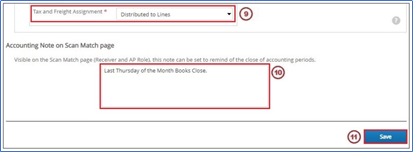
9. The Tax and Freight Assignment pulldown menu has 2 selections, Distributed to Lines and Specific
Accounts. Selecting Distributed to Lines distributes the tax and
freight between each line item in the order. Selecting Specific Accounts allows
the Tax and Freight to be assigned individually to a GL Account.
10. An Accounting Note can be entered
here. The note entered here will appear in the Scan Match window for the
Receiver and Accounts Payable roles.
11. Press Save when the configuration is complete.
AP Management > General > Tolerances
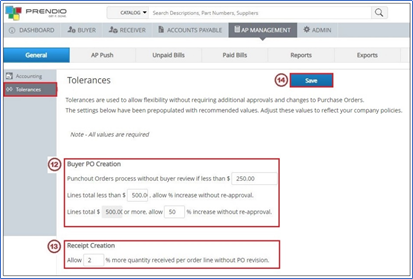
12.
Buyer PO Creation is where the maximum
amount for a Punchout Order that does not require a Buyer Review is entered.
It is also where the monetary amounts are entered for the percentages of a
change to that amount determine whether re-approval is required.
13.
Receipt Creation is where the percentage
of the quantity of an item received per order line without a PO revision.
14. Always press Save when a change is made.
AP Management > AP Push Window
Note: Clicking on the links in
the Voucher, PO, and Supplier columns will open these in a new browser tab.
Clicking on the link in the Part Description column allows the user to rename
or edit this description.
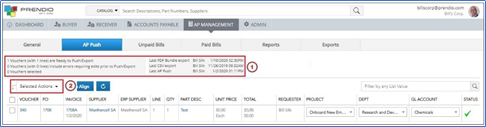
1. These fields inform the how many vouchers are in this window, how many vouchers include error messages, how many vouchers are
selected, who performed the last PDF Bundle export, who performed
the last CSV export, and who performed the last push.
2. The Selected Actions pulldown
menu lists the actions that can be taken after voucher(s) are selected in
the AP Push window.
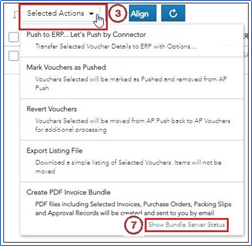
3. Click in the Selected Actions pulldown menu to display the following choices:
Selecting
Create PDF Invoice Bundle will open
the Export Selected PDFs window.
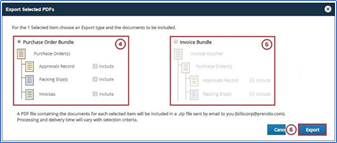
4. When selecting Purchase Order Bundle the Approvals Record, Packing Slip(s), and Invoices will be included in the bundle for the
vouchers selected.
5. When selecting Invoice Bundle the Approvals Record,
and Packing Slip(s), and Invoices will be included in the bundle for the
vouchers selected.
6. Press Export to create the Bundle.
7. Clicking on the Show
Bundle Server Status will open the Show Bundle Server Status window.
Show Bundle Server Status
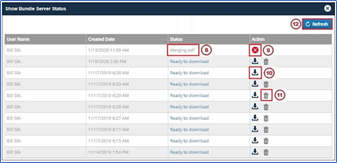
8. The Status of the request appears in this column.
9. The request can be cancelled by pressing
this icon.
10. The request can be downloaded by pressing
this icon. Note: Depending on the size of the file, the
bundle or a link to the bundle will be emailed to the user that requested it.
11. Click on the Trash Can icon to delete a
request.
12. Press Refresh to update the status of
the request.
Note: On
Page 2 AP Push Bundles were detailed. AP Push Bundles are not available when
ERP Integration is not enabled or with Quickbooks Desktop so creating a PDF
Invoice Bundle would be an alternative for these configurations.
AP Push Window:
Click on the link in the
Voucher, PO, or Invoice Columns to view these in a new tab. Click
on the link in the Supplier Column to open the Supplier Detail window for that supplier. Click on the link in the Part Description Column to edit/change the description.
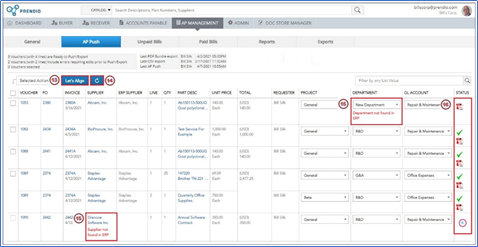
13. Let’s Align is
used to align the Suppliers, Projects, Departments,
and GL Accounts between Prendio
and the ERP System;
14. Use this Refresh icon rather
than the Browser Refresh icon to refresh this window;
15. In these examples Supplier
not found in ERP and Department not found in ERP displays for these vouchers. This means that a Let’s Align is
needed.
16. A Checkmark
& PDF Icon will display in the Status column when the Voucher is ready to be Pushed. If No Checkmark appears, that Voucher is not ready to
push. If a Spinning Clock Icon displays,
the system is creating the AP Push Bundle for that Voucher.
If the Checkmark does not appear, the voucher cannot be pushed:
If a PDF Icon does not display in the Status column, either that ERP System does not support AP Push Bundles or a bundle was not selected.
Let’s Align:
Note: You do not need to
select the Checkbox next to any vouchers that need alignment. The system will
locate them automatically.
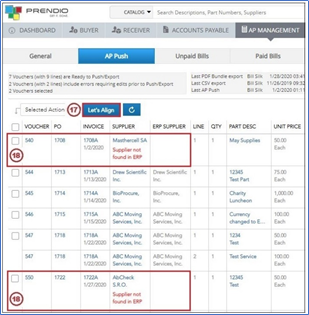
17. Let’s Align is
then pressed.
18. In this example the system will automatically
locate these Vouchers.
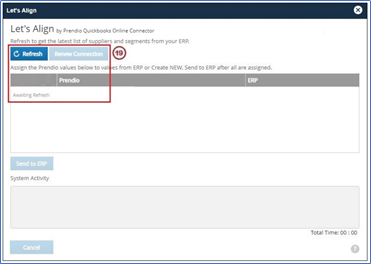
19. Awaiting
Refresh is displayed in the Let’s Align window. In this example if Refresh was grayed out, Renew Connection would need to be pressed to renew the
connection with Quickbooks first. Refresh is then pressed to align the Prendio resources with
the ERP Resources.
20. The System Activity field
captures feedback during the Let’s Align Process.
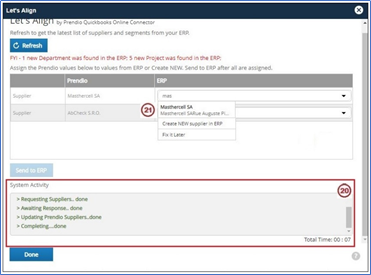
The 2 Suppliers that
need alignment were found.
21. In this example I started typing the name of
the supplier until it was found in the ERP System. When
this supplier was found, it was selected.

22. I started typing the name of the second
supplier, but it was not found in the ERP System. For this reason, Create NEW supplier in ERP was selected.
23. Send to ERP was
then pressed, this will map the first supplier found
in the ERP System to the Supplier in Prendio. It will also create the second supplier in the ERP System and map that to
the Prendio Supplier.
The Let’s Align
window will automatically close when the alignment is complete.
Notes: When aligning Suppliers with the ERP System Prendio can map to a supplier that
is defined in the ERP System or create that Supplier in the ERP System and map
that supplier. When aligning Projects, Departments, and GL Accounts (Segments) Prendio
can map these resources to Projects, Departments, and GL Accounts that exist in
the ERP System but cannot create the Projects, Departments, or GL Accounts in
the ERP System. These need to be created in the ERP System first, then they can
be mapped with a Let’s Align or a Sync of these resources in Accounts Payable
will also import them into Prendio for manual mapping.
Performing A Push:
During a push to the ERP
System many actions are taking place. Along with pushing the selected for
payment, the system also checks for duplicates and updates the status of
previously pushed bills prior to the current push.
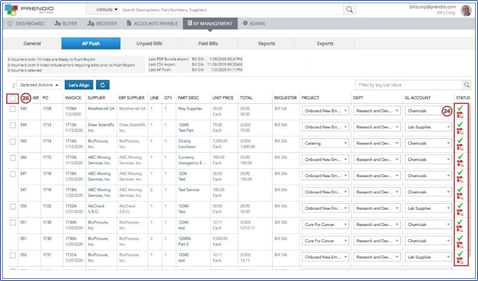
24. The Status column displays Green Check Marks, so are ready to push.
25. Check the top
checkbox to select all vouchers or check individual voucher(s).
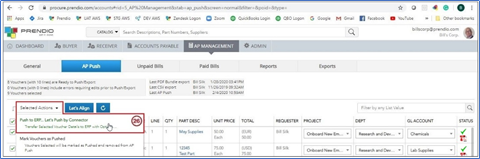
26. In this example, all of the vouchers were
selected. Push to ERP...Let’s Push by Connector is then selected from the Selected Actions pulldown menu.
Note: The
field above Selected Actions displays 9 Vouchers selected.
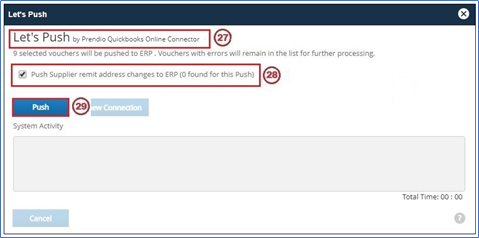
27. The top of the Let’s Push window displays the type of ERP System.
28. Prendio allows the user to push supplier remit address changes when this box
is checked. No address differences were found in this example.
29. Press Push to push the bills to the ERP System.
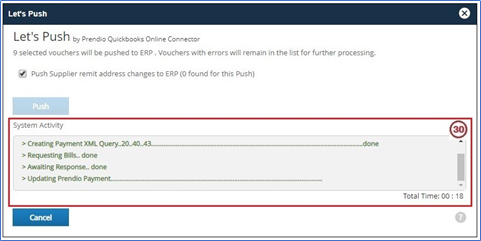
30. The progress displays
in the System Activity field.
Note: The Let’s Push window will automatically close when the alignment is complete.
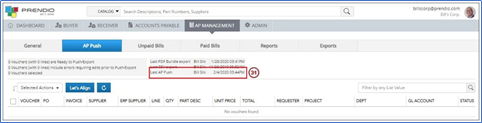
31. All of the
vouchers successfully pushed and Last AP Push field
was updated.
The bills pushed
here were moved to the AP Management > Unpaid Bills window.
Any bills that were
pushed prior to this push, and paid through the ERP System prior to this push,
were moved to the AP Management > Paid Bills window.
AP Management > AP Push > Unpaid Bills
Note: Clicking on
the links in the PO#, Inv#, and Voucher# columns will open these in a new
browser tab. The columns in this window that have an Arrow icon in the heading
can be sorted using this icon.
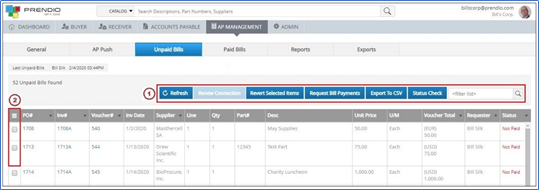
2. Check
the top checkbox to select all bills or check individual boxes
for individual bills.
Requesting Bill Payments:
In this example I
paid three bills in the ERP System and will now update these bills in Prendio.
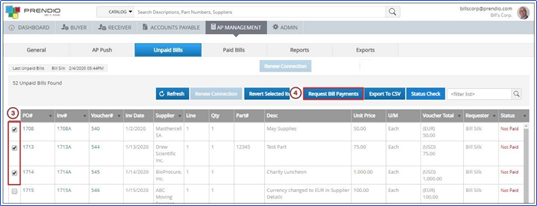
3. The three bills that
were paid are selected in the Unpaid
Bills window.
4. Request Bill Payments was
then pressed.
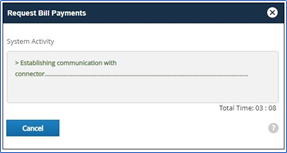
OK the Prompt
that appears to continue with the payment updates.
The Request Bill
Payments window will open while the payments are being updated and
automatically close when complete.
Note: The bills that the ERP System responded as Paid, will be moved to the Paid
Bills window.
AP Management > Paid Bills
Note: Clicking on
the links in the PO#, Inv#, and Voucher# columns will open these in a new
browser tab. The columns in this window that have an Arrow icon in the heading
can be sorted using this icon.
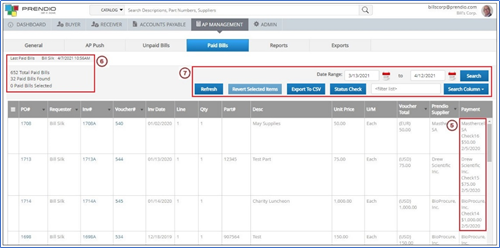
5. The payments for the
bills just updated appear in the Payment column.
6. When the Paid Bills
were just updated appears here.
AP Management > Reports
Note: A variety of reports can be run from
this window. This document provides an overview. For more detail on any report,
click on the Prendio Software Guide Link on the Dashboard and
search for Prendio Report.

1. From
the Report pulldown menu you can select the AP Order Analysis, Paid Bills Report, Unpaid Bills Report, User Summary, Department Summary, Open PO Summary, Open
PO Detail, Proxy Request Summary Report, and PO Summary reports.
2. Depending upon the report selected, the Email
Report, Run Report, Export, and Status
Check buttons may be available. Email
Report will email the report to the user that requested it when it is complete.* Run Report will generate the report in the Reports window.
Export will export
the request in a CSV file.
Note: While
the Report is being created, Export will be grayed out. Status Check opens a Status Check window where the progress of the request can be updated,
and the report downloaded when it is complete.
* The Status Check window
can also be used to monitor the progress of the request can be updated and the
report downloaded when it is complete.
Report Creation Criteria
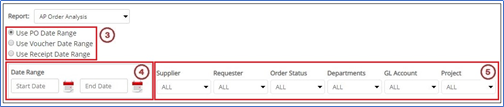
3. When
selecting one of these Radio Buttons, the report will use the creation date of
either the PO, Voucher, or Receipt, depending upon which
selection is made.
4. Enter
the Start Date and End Date range to be used when creating
the report.
5. Leave
the Supplier, Requester, Order Status, Departments, GL Account, or Project fields at ALL
to include all of these or use a filter to include specific data.
AP Management > Exports
Purchase Order, Invoice,
and Payment Export Bundles can be created. These bundles are exported in
a compressed format (zip file) and contain the PDF documentation
requested.
Note: A variety of exports can be requested
from this window. This document provides an overview. For more detail on any export,
click on the Prendio Software Guide Link on the Dashboard and
search for Bundle.
Both the Status Check and Export
buttons are unique to the Export Bundle radio button selected in this window.
What displays in the Status Check window will depend upon which radio button is
selected. When pressed, the Export button will start processing the request for
the radio button currently selected.
As with the Reports window, pressing
Status Check opens a Status Check window where the progress of the request can
be updated, and the report downloaded when it is complete.
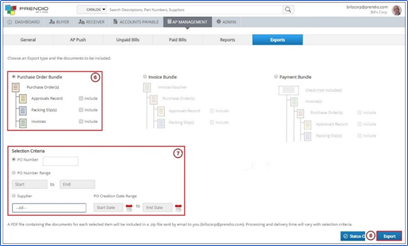
6. When selecting Purchase Order Bundle the bundle can include
the Approvals Record, Packing Slip(s), and Invoices if these boxes are checked.
7. Either a PO Number, a PO Number Range, or Supplier(s) can be selected for the bundle.
8. Press Export to create the bundle.
Note: The Export
button will be grayed out while the system is processing a request, it will
become available again when the request is complete.
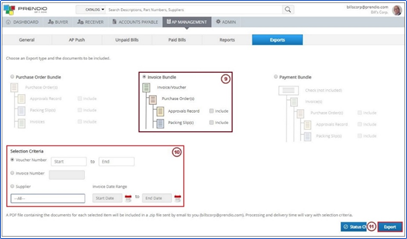
9. When
selecting Invoice Bundle the bundle can include the Approvals Record and Packing
Slip(s) if these boxes are checked.
10. Either a Voucher Number Range,
an Invoice Number, or Supplier(s) can be
selected for the bundle.
11. Press Export to create the bundle.
Note: The Export
button will be grayed out while the system is processing a request, it will
become available again when the request is complete.
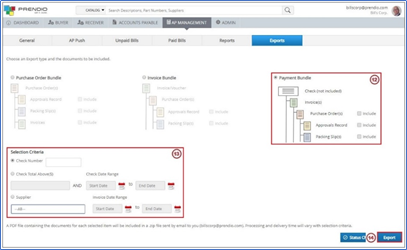
12. When selecting Payment Bundle the
bundle can include the Purchase Orders, Approvals
Record, and Packing Slip(s) if these boxes are checked.
13. Either a Check Number, a Check Total Above ($), or Supplier(s) can be
selected for the bundle.
14. Press Export to create the bundle.
Note: The Export
button will be grayed out while the system is processing a request, it will
become available again when the request is complete.